Tuesday, April 26, 2011

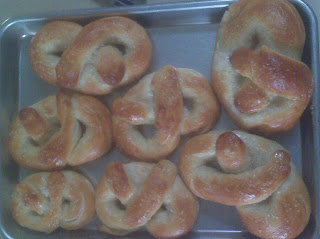
Twist and Shout When You Pull These Pretzels Out!

Ever get all twisted up in knots like a pretzel wanting a pretzel that's as close to Auntie Anne's as you can get without having to venture out of your cozy, comfy home? Me too!

I remedied that by pulling out my trusty Zojirushi BB-CEC20 Home Bakery Supreme 2-Pound-Loaf Breadmaker, Black and whipping up some buttery soft pretzel dough, rolling it out and twisting it into knots.

What makes them "pretzels" is dipping them into a solution of baking soda and hot water before baking them in the oven. Originally pretzels were dipped in a solution of lye and water.

GASP! "Lye?!", you ask. Yes, lye, but it's a real quick dip. I tried to find some lye for this recipe, but it's a bit expensive for no more than I make pretzels so I settled for the baking soda and water.

I've only made pretzels three times, but all three of those times were within a week because they turned out THAT GOOD and were in big demand. If I can do it so can you.

This is a good recipe to do with the kids on a rainy day. Let your bread maker or stand mixer do the kneading work. Once that's done, form an assembly line made up of kids. One can roll out the log, one can twist them, and another can be the dipper. Here's the recipe so you can get started asap! Have fun and enjoy!

Buttery Soft Pretzels
  • 4 teaspoons active dry yeast
  • 1 teaspoon white sugar
  • 1 1/4 cups warm water (110 degrees F/45 degrees C)
  • 5 cups all-purpose flour
  • 1/2 cup white sugar
  • 1 1/2 teaspoons salt
  • 1 tablespoon vegetable oil  
Mix a solution of
  • 1/2 cup baking soda
  • 4 cups hot water
  • 1/4 cup kosher salt, for topping

  1. In a small bowl, dissolve yeast and 1 teaspoon sugar in warm water. Let stand until creamy, about 10 minutes.
  2. In a large bowl, mix together flour, 1/2 cup sugar, and salt. Make a well in the center; add the oil and yeast mixture. Mix and form into a dough. If the mixture is dry, add one or two tablespoons of water. Knead the dough until smooth, about 7 to 8 minutes. Lightly oil a large bowl, place the dough in the bowl and turn to coat with oil. Cover with plastic wrap and let rise in a warm place until doubled in size, about 1 hour.
  3. Preheat oven to 450 degrees F (230 degrees C). In a large bowl, dissolve baking soda in hot water.
  4. When risen, turn dough out onto a lightly floured surface and divide into 12 equal pieces. Roll each piece into a rope and twist into a pretzel shape. Once all of the dough is all shaped, dip each pretzel into the baking soda solution and place on a greased baking sheet. Sprinkle with kosher salt.
  5. Bake in preheated oven for 8 minutes, until browned. 

Monday, April 25, 2011

Sour Cream Coconut Cake


My favorite real estate agent, Mary Ann Rivera, wants the recipe for the Sour Cream Coconut cake I made for Easter. So, as promised, Mary Ann, I've finished my hotdog and here it is. :-)

I've always made Sour Cream Coconut cake with a white cake mix, but this time I decided to try making it totally from scratch. So, I set out in search of a recipe for white cake on my favorite recipe site, allrecipes.com and found this one for Simple White Cake with over 1200 reviews.

It is a good cake, but I think using a glass baking dish in my RV oven didn't quite do it justice. My Nordic Ware 9-by-13-Inch Cake Pan with Storage Lid that I used for the carrot cake seems to do a better job of circulating the heat more evenly around the batter in my RV oven.

The Sour Cream Coconut Icing recipe I used calls for whipped topping so I found a whipped cream recipe for that, too, rather than using ready made whipped topping.YUM! Good stuff, Maynard!

In a nutshell, the recipes for each are:

Simple White Cake
  • 1 cup white sugar
  • 1/2 cup butter
  • 2 eggs
  • 2 teaspoons vanilla extract
  • 1 1/2 cups all-purpose flour
  • 1 3/4 teaspoons baking powder
  • 1/2 cup milk
  1. Preheat oven to 350 degrees F (175 degrees C). Grease and flour a 9x9 inch pan or line a muffin pan with paper liners.
  2. In a medium bowl, cream together the sugar and butter. Beat in the eggs, one at a time, then stir in the vanilla. Combine flour and baking powder, add to the creamed mixture and mix well. Finally stir in the milk until batter is smooth. Pour or spoon batter into the prepared pan.
  3. Bake for 30 to 40 minutes in the preheated oven. For cupcakes, bake 20 to 25 minutes. Cake is done when it springs back to the touch.
 Whipped Cream
  • 1 cup heavy cream
  • 1 teaspoon vanilla extract
  • 1 tablespoon confectioners' sugar
In a large bowl, whip cream until stiff peaks are just about to form. Beat in vanilla and sugar until peaks form. Make sure not to over-beat, cream will then become lumpy and butter-like.

Sour Cream Coconut Icing
  • 1 pint (16 ounces) sour cream
  • 1 cup granulated sugar
  • 3 cups coconut
  • 3 cups frozen thawed whipped topping (8 ounces), light or regular

In a mixing bowl, combine the sugar, sour cream, and coconut. Fold in the whipped topping. Fill and frost a 2 to 4 layer cake.

Absolutely THE Best Carrot Cake Recipe!

I've made upteen hundreds of carrot cakes over the years. My oldest daughter thinks she HAS to have one every time she visits us or we visit her. So, of course, for Easter we had another one, as well as a Sour Cream Coconut Cake.

Of all the carrot cake recipes I've used, THIS one was ABSOLUTELY THE BEST ONE! The recipe seen below has over 3200 reviews and 100 custom revisions on allrecipes.com (<---I LOVE, LOVE, LOVE this recipe website!!!)

I used my Swissmar Borner V-Slicer Pro Mandoline V-4000, 7-Piece Set to create very thin julienne strips and finely grate a little bit of carrot to embellish the top of the cake.
Carrot Cake
  • 4 eggs
  • 1 1/4 cups vegetable oil
  • 2 cups white sugar
  • 2 teaspoons vanilla extract
  • 2 cups all-purpose flour
  • 2 teaspoons baking soda
  • 2 teaspoons baking powder
  • 1/2 teaspoon salt
  • 2 teaspoons ground cinnamon
  • 3 cups grated carrots
  • 1 cup chopped pecans
  • 1/2 cup butter, softened
           Cream Cheese Icing
  • 8 ounces cream cheese, softened
  • 4 cups confectioners' sugar
  • 1 teaspoon vanilla extract
  • 1 cup chopped pecans

Directions

  1. Preheat oven to 350 degrees F (175 degrees C). Grease and flour a 9x13 inch pan.
  2. In a large bowl, beat together eggs, oil, white sugar and 2 teaspoons vanilla. Mix in flour, baking soda, baking powder, salt and cinnamon. Stir in carrots. Fold in pecans. Pour into prepared pan.
  3. Bake in the preheated oven for 40 to 50 minutes, or until a toothpick inserted into the center of the cake comes out clean. Let cool in pan for 10 minutes, then turn out onto a wire rack and cool completely.
  4. To Make Frosting: In a medium bowl, combine butter, cream cheese, confectioners' sugar and 1 teaspoon vanilla. Beat until the mixture is smooth and creamy. Stir in chopped pecans. Frost the cooled cake.
I didn't change anything in this recipe. I followed this one exactly as is. Next time I may try adding some pineapple and/or use 1/2 white sugar and 1/2 brown sugar. What changes, if any, would you make?

Friday, April 22, 2011

US Marines in Afghanistan Enjoy Downtime

Haha! LOVE it! Had to share it cuz it's just too dang cute not to. Glad to see our troops are able to find a way to make the most of their situation. Great video!

Super Delicious Zuppa Toscana

Soups are for fall, aren't they? At least that's when I prefer them. So why am I enjoying Super Delicious Zuppa Toscana and Soft Garlic Breadsticks now? Because somebody forgot to tell Mother Nature that it's Spring and she's behaving as though it's Fall out there with cool, wet weather.

The breadsticks are a cinch to make when I use my Zojirushi Breadmaker. I let the breadmachine do the mixing, kneading, and first rise. Of course, I could also let my KitchenAid Mixer to the work, too.

While the breadsticks are on their first rise I prepare the Zuppa Toscana. Once it's ready for some simmer time, my breadsticks are ready to be rolled out for their second rise. After the second rise and they're in the oven, it's time to prepare a salad (which I didn't do this time) and top it with Italian Dressing.

Ok, so I'll go along with Mother Nature's game plan if it means I get to enjoy a fabulous restaurant style Italian soup, garlic breadsticks, and salad with a zesty Italian dressing.

*Sponsored Post*

Beautiful Handmade Western Copper Wire Jewelry


Wish you had the perfect jewelry set to set off your favorite western outfit? Look! There to the left...there it is! You'll find it at Happy Trails along with other gorgeous sets of handmade copperwire jewelry, fashion accessories and gifts.

Happy Trails' copperwire jewelry sets are one-of-a-kind sets in various styles, shapes, colors and textures and handmade by Pamela Lax. Transition from casual to dressy in any fashion style with these attractive, eye-catching accessories.

Sets include wrist cuff bracelets, leather pendants, earrings, and rings. You can also purchase individual pieces. Better click on over there to get your set ASAP because these sets are selling out pretty fast!

While you're there be sure to check out the unique western fashion accessories (especially the Montana Silversmith Messenger Bag - Purse made with Angora wool and hand tooled mahogany leather embellished with brass studs and elaborate silver tone hardware!) and gifts.

Tuesday, April 19, 2011

Slice It, Dice It, Julienne It


----------------------------------------------------------------------------------
*UPDATE* My V-Slicer Pro finally made it here this afternoon and, needless to say, I had to play with it right away. LOVE it! I sliced and diced onions, potatoes, and apples. Fried some of the taters and onions, baked cinnamon apple slices, and, best of all....I made potato chips in the microwave. They were VERY good, too. Instead of sprinkling salt on them, I sprinkled Tony Cachere's Creole Seasoning on them. MMmmmm GOOD! The V-Slicer did an excellent job of slicing them paper thin, too.
----------------------------------------------------------------------------------
OMGosh! So excited! Can't wait for the UPS truck to pull up tomorrow so I can begin to slice and dice every fruit and veggie I can get my hands on! My new Swissmar Borner V-Slicer Pro Mandoline V-4000, 7-Piece Set will FINALLY be here!

Kind of reminds you of Tim the Toolman, huh? Arrgghh, arrgghh, aaaaarrrrggggghhhhh!

I ordered the mandoline because I've grown tired of spending so much time slicing and dicing now that I'm doing a lot more cooking. It's the economy, ya know? But time is also valuable. I mean, reeeaaaaaLY, you can't expect a full-time RVer to want to spend all her time in the kitchen, can you? The essence of RVing is simplifying life after all.

Ok, I'm headed off to bed to count fruit and veggie slices. I'll share the results of my first test runs as soon as I get a chance to play with my new toy. In the meantime, check out this video showing the fun you can have slicing and dicing your way to creative dishes with the Swissmar Borner V-Slicer Pro Mandoline V-4000, 7-Piece Set.


*Sponsored Post*